myWeather Lab
Overview
In this lab, you will create a weather station collector workflow using data from api.weather.gov. Once you collect the weather information, you will transform the data into a JSON object that will then be ingested into IBM's SevOne observability solution.

As you create your weather station collector you will be using a design pattern where you have a main workflow that will call sub-workflows ("subflows") to accomplish certain tasks. Think of subflows like functions that can be used to break up development into smaller discrete items. You can reuse subflows that you have written in the past, or use those written by others so you don't have to start from scratch.
The main workflow for this lab will be called Weather Collector. It will use the following two subflows to accomplish some of its tasks:
- get weather - You will construct this workflow to retrieve current weather info from api.weather.gov
- ***SevOne Ingest Data - APIV3- You will retrieve this reusable workflow from https://community.ibm.com/community/user/aiops/viewdocument/sevone-data-ingestion-api-v3?CommunityKey=fe9d91df-352c-4846-9060-189fd98d00ca&tab=librarydocuments
Steps:
[1] Create an authentication called sevone to connect to the SevOne NMS
- Protocol: https://
- IP: 10.0.0.10
- User: admin
- Password: _your password here_
[2] Create the main workflow called Weather Collector
[A] Define the following variables in the start block of the main Weather Collector workflow:
- Name: deviceName
- Type: string
- Default Value: "myWeather"
- check the checkboxes for "Out" and "Log"
- Name: stationId
- Type: string
- Default Value: "KDFW"
- check the checkboxes for "Out" and "Log"
- Name: timestamp
- Type: Number
- Default Value: 0
- check the checkboxes for "Out" and "Log"
- Name: Fahrenheit
- Type: Number
- Default Value: 0
- check the checkboxes for "Out" and "Log"
- Name: content
- Type: Object
- Default Value: {}
- check the checkboxes for "Out" and "Log"
- Name: NMSCredentials
- Type: Authentication
- Default Value: "admin/sevone"
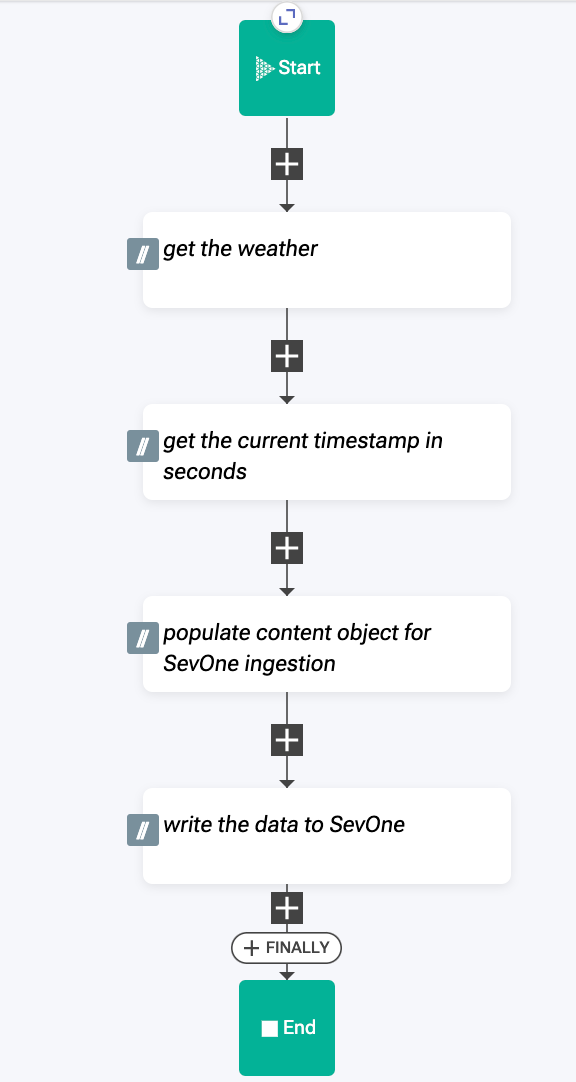
[B] Add the following comments to your workflow to describe what your workflow will need to accomplish
get the weather
get the current timestamp in seconds
populate content object for SevOne ingestion
write data into SevOne
Your workflow should look like this:
[C] Save your workflow
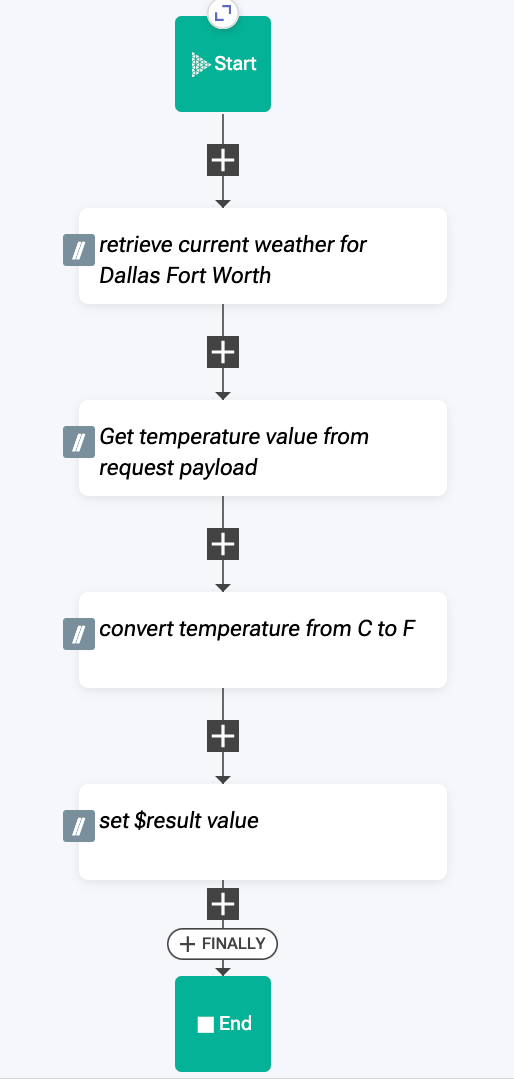
[3] Create a new workflow called get weather
This workflow will be used as a subflow from within your main workflow. It will retrieve weather information from api.weather.gov and will then pass the result to the main workflow.
[A] Define the following variables in the start block of the subflow get weather workflow:
- Name: stationId
- Type: string
- Default Value: "KDFW"
- check the checkbox for "In"
NOTE: By checking the "In" checkbox, you enable the main workflow to pass the property value into your subflow workflow.
- Name: host
- Type: string
- Default Value: "api.weather.gov"
- Name: C
- Type: number
- Default Value: 0
- Name: F
- Type: number
- Default Value: 0
[B] Add the following comments to your workflow to describe what your workflow will need to accomplish
Retrieve current weather for Dallas Forth Worth
Get temperature value from request payload
convert temperature from C to F
set $result value
Your workflow should look like this:
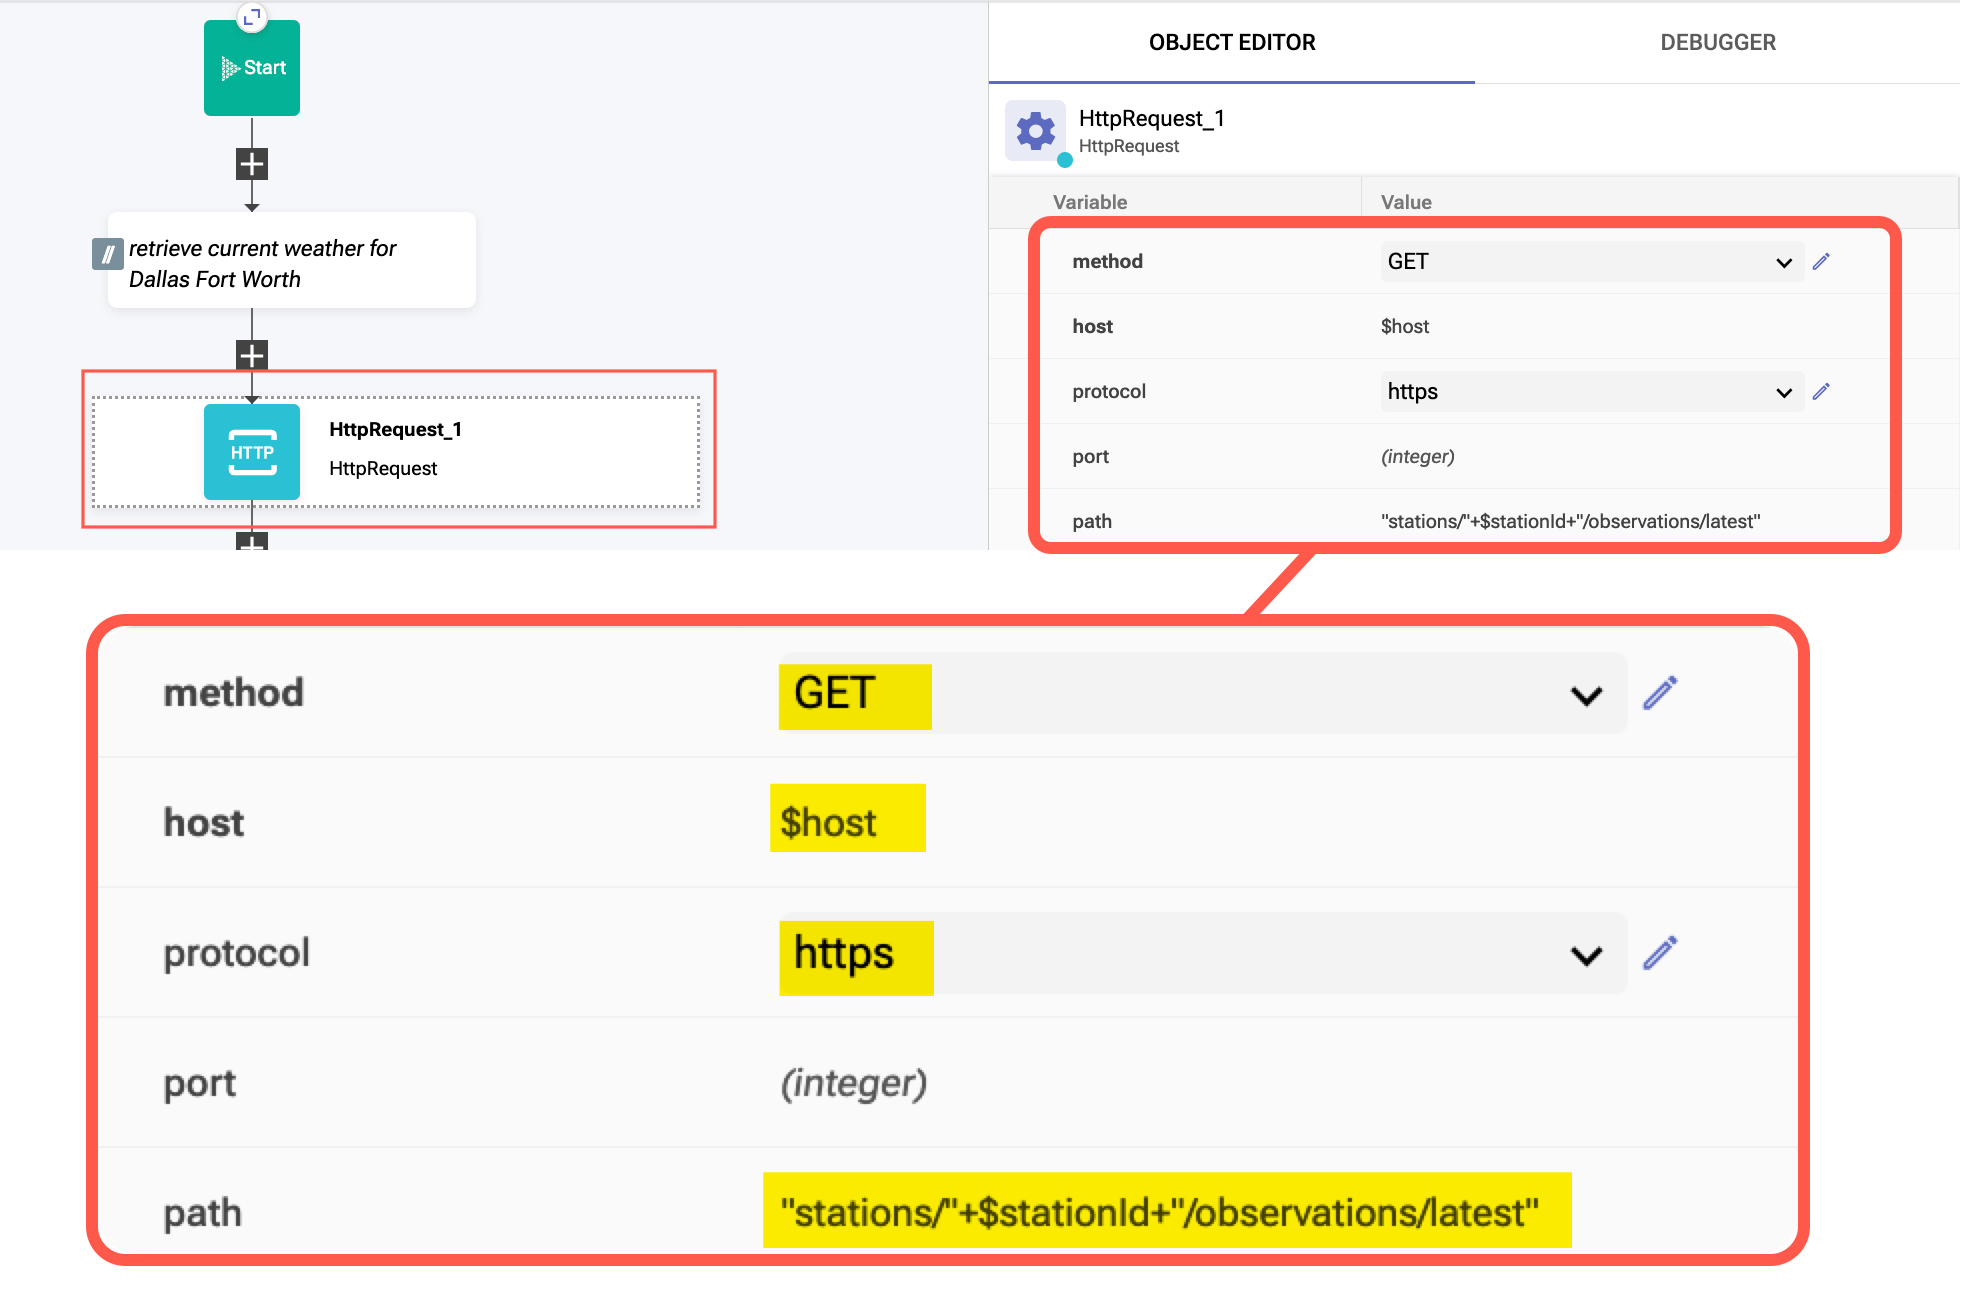
[C] Add a HTTPRequest action block to your workflow under the first comment
This action block will cause a HTTP Request to be issued to api.weather.com and retrieve the current weather data for your stationId station.
Find the action block using the action block palette on the left side of the workflow editor.
Select Home > Common then search for HTTP

Drag the HTTPRequest action block into the workflow under the first comment and edit its settings in the Object Editor using the image for your guide:
[D] Add an Assign action block to your workflow under the second comment
You will assign the value for your variable C (celsius) from the HTTPRequest_1 result payload.
Find the action block using the action block palette on the left side of the workflow editor.
Select Home > Common then search for Assign
Drag the Assign action block into the workflow under the second comment and edit its settings in the Object Editor using the image for your guide:
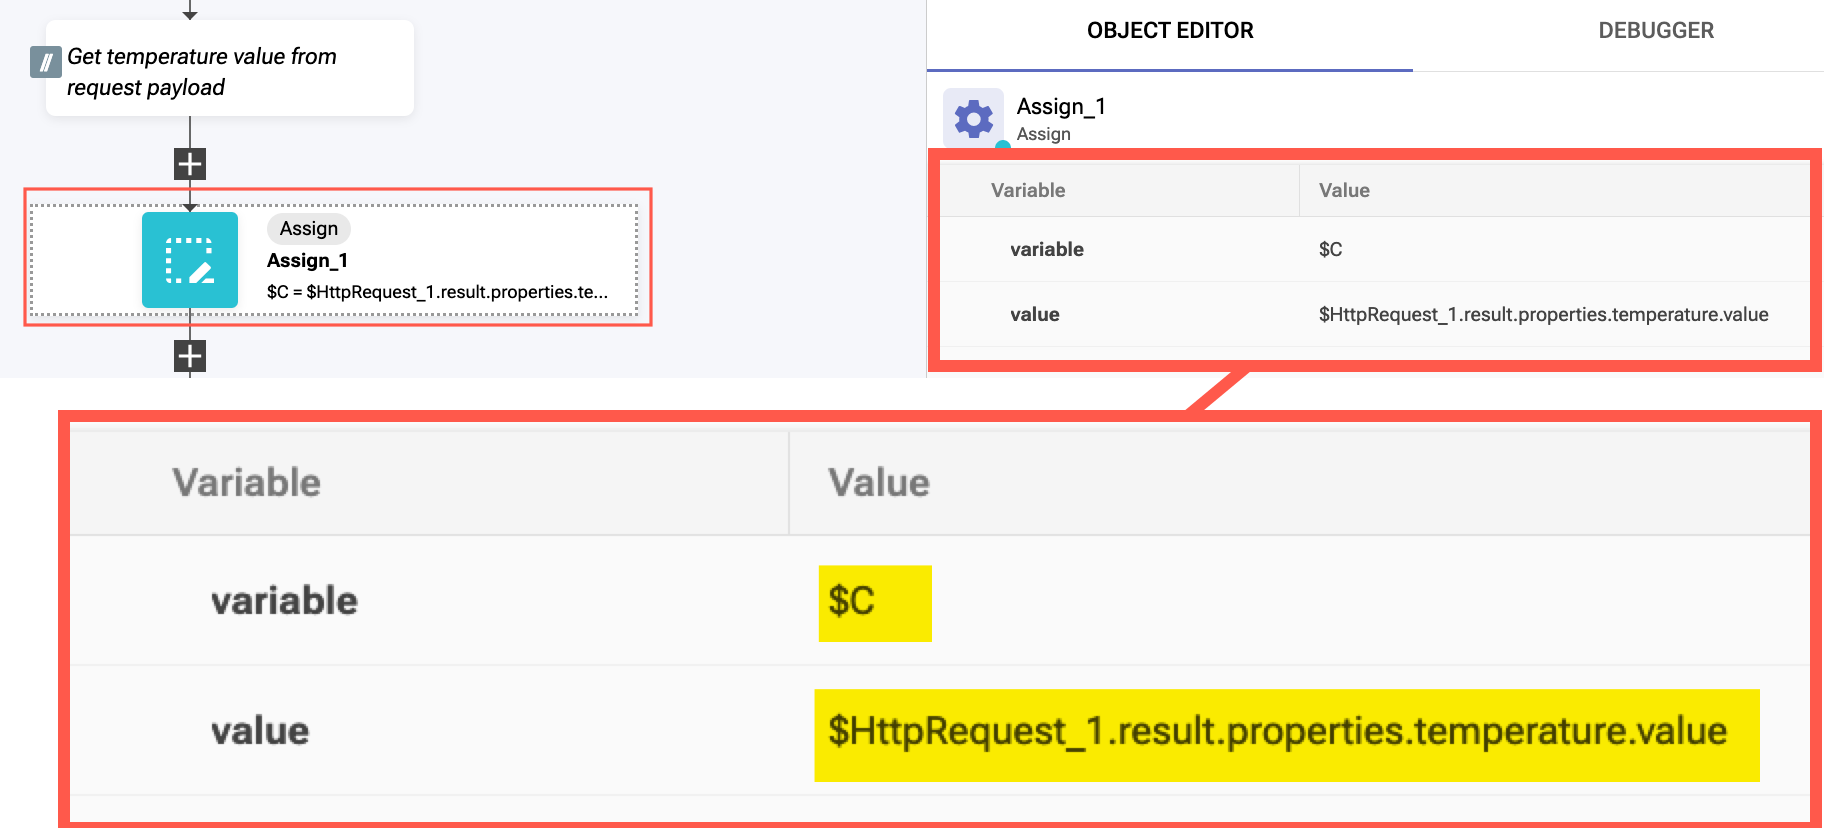
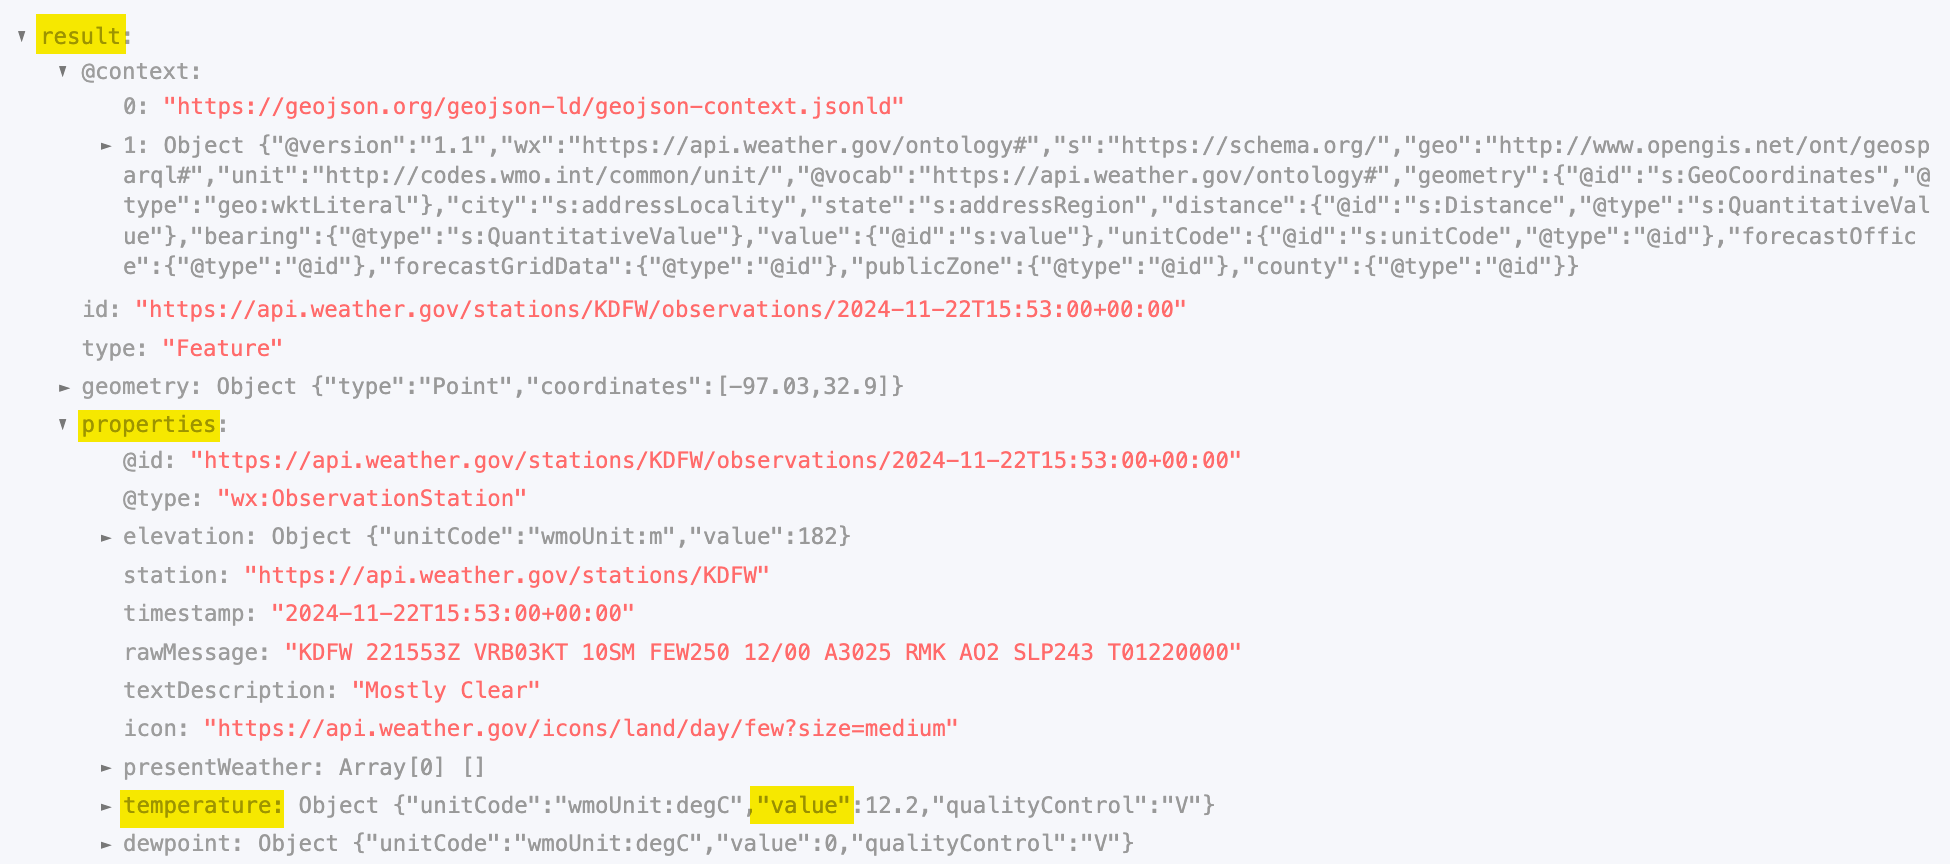
Let's take a look at the payload returned from the HTTPRequest_1 action block:
The path to the temperature value is contained within the payload's JSON object
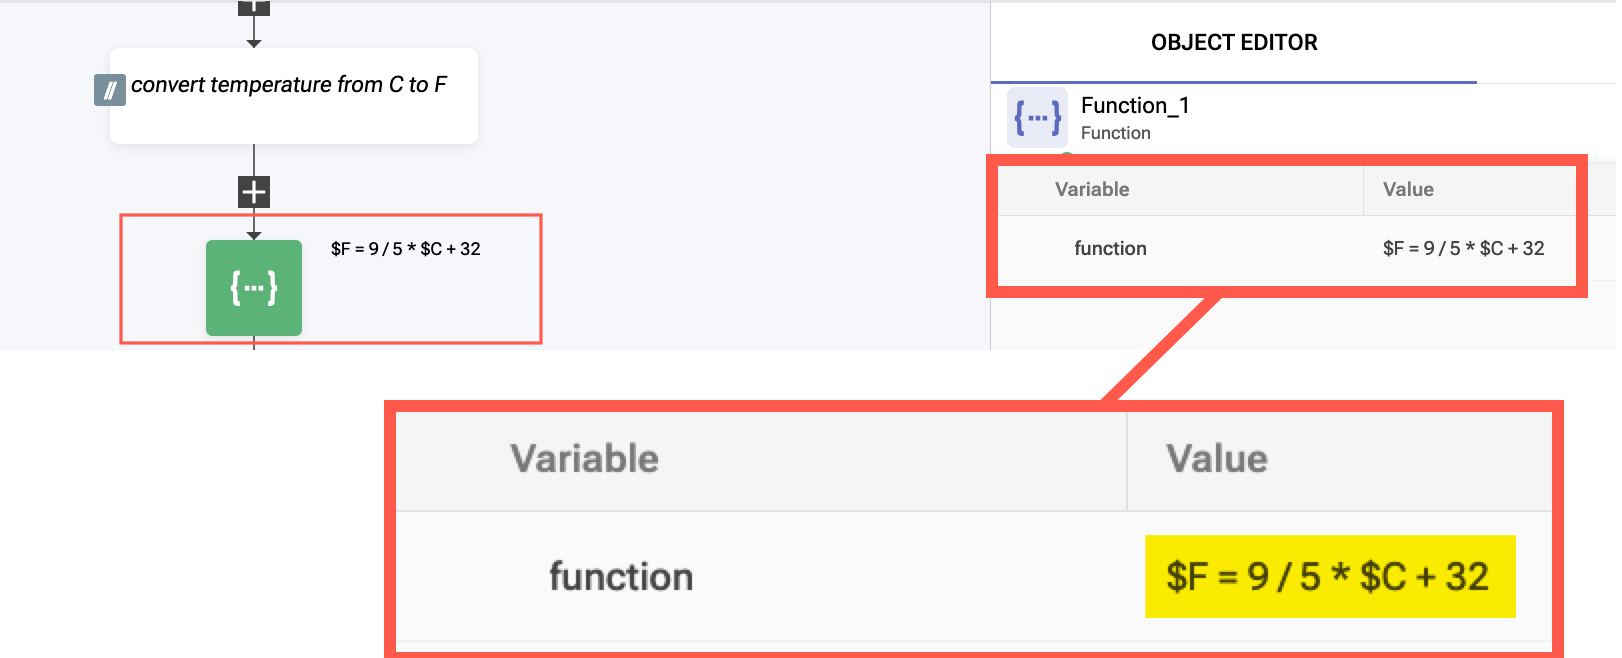
[E] Add a Function action block to your workflow under the third comment
You will convert your C (celsius) value to F (fahrenheit) within the function block
Find the action block using the action block palette on the left side of the workflow editor.
Select Home > Common then search for function
Drag the Function action block into the workflow under the third comment and edit its settings in the Object Editor using the image for your guide:
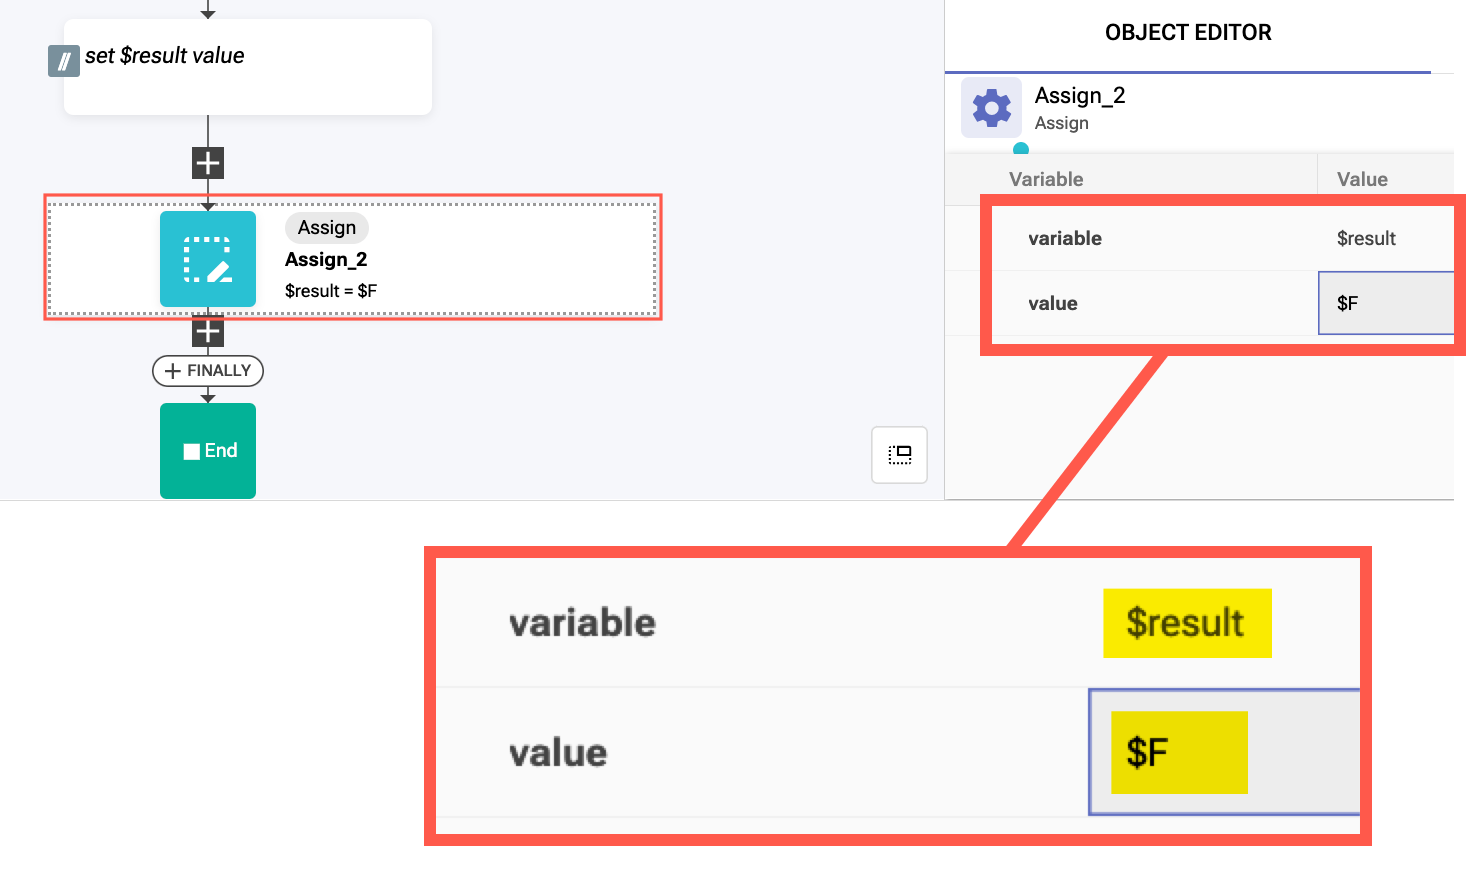
[F] Add an Assign action block to your workflow under the final comment
The $result value will be returned to the main Weather Collector workflow. You need to set $result to the $F (fahrenheit) value here
Find the action block using the action block palette on the left side of the workflow editor.
Select Home > Common then search for Assign
Drag the Assign action block into the workflow under the final comment and edit its settings in the Object Editor using the image for your guide:
[G] Save your workflow
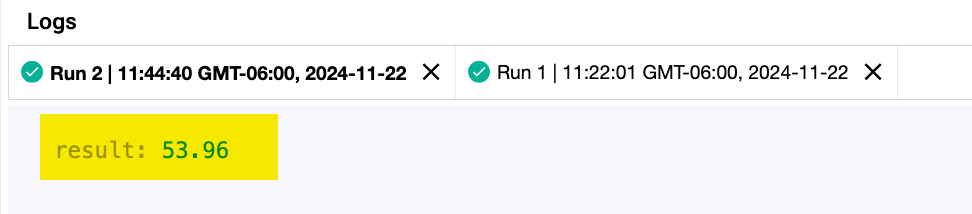
[H] Run your workflow and verify it returns a numeric result
[4] Download and import "SevOne Ingest Data" workflow from IBM Community website
[A] Download the "SevOne Ingest Data" workflow from the IBM Community website:
https://community.ibm.com/community/user/aiops/viewdocument/sevone-data-ingestion-api-v3?CommunityKey=fe9d91df-352c-4846-9060-189fd98d00ca&tab=librarydocuments
Scroll down to find the "Attachments" area. Download the "absolute SevOne Ingest Data - APIv3 (new v3 version) 2024.zip" file.
Within the RNA "Workflows" area, click on the "Import" button located in the upper right-hand corner of the page.
[B] Import the workflow
- Within the RNA "Workflows" area, click on the "Import" button located in the upper right-hand corner of the page.
- Import the newly downloaded workflow zip file.
[5] Edit the main "Weather Collector" workflow
Now that you have both subflow workflows ready, it's time to complete the main workflow. As you may recall, the object of this workflow is to get the current weather conditions for Dallas Fort Worth -- you accomplished this using a subflow called get weather. Now its time to take the result of that subflow and format it into a JSON object that can be passed into the subflow that you downloaded and imported from the IBM Community website. Once the JSON object is ready, you will pass it into the SevOne subflow so that it is ingested into that solution. You can then login to SevOne to see the fruits of your labor.
When we last edited this workflow, we defined the "Start Block" variables and then added some comments to the workflow.
[A] Add the first subflow to the main workflow
Find the subflow action block using the action block palette on the left side of the workflow editor.
Select Home > User then select get weather subflow.
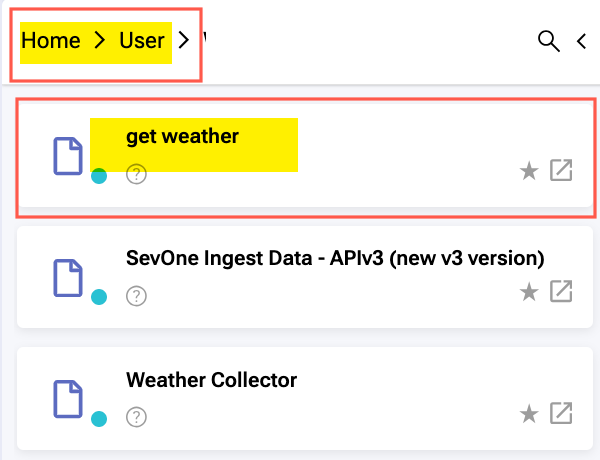
Drag the get weather action block into the workflow under the first comment and edit its settings in the Object Editor using the image for your guide:
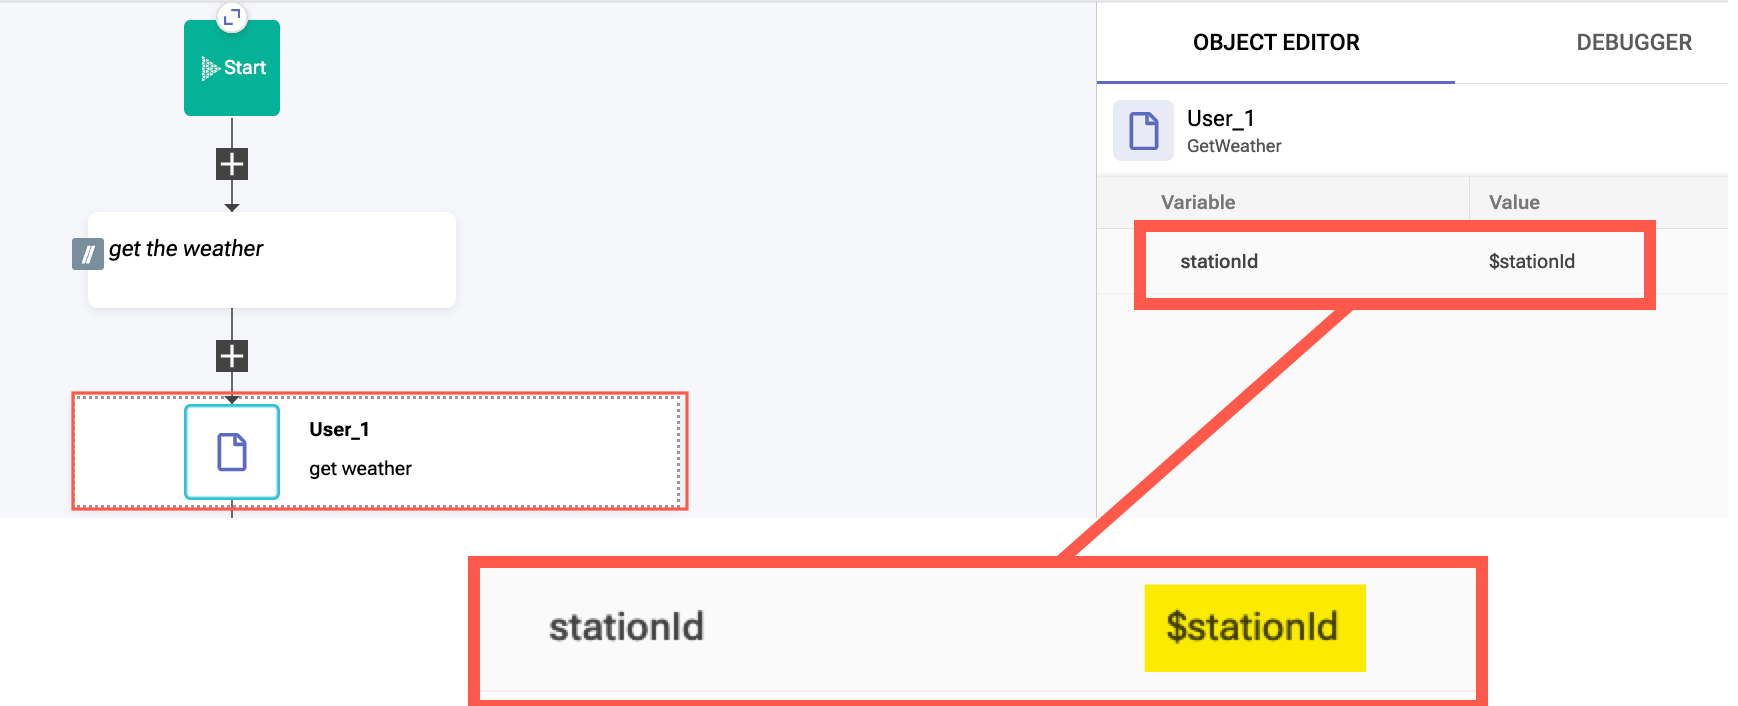
You add the $stationId value to the subflow settings so that it will be passed into the subflow.
[B] Add an "Assign" action block below the "User_1" block
Drag the Assign action block into the workflow under the User_1 block and edit its settings in the Object Editor using the image for your guide:
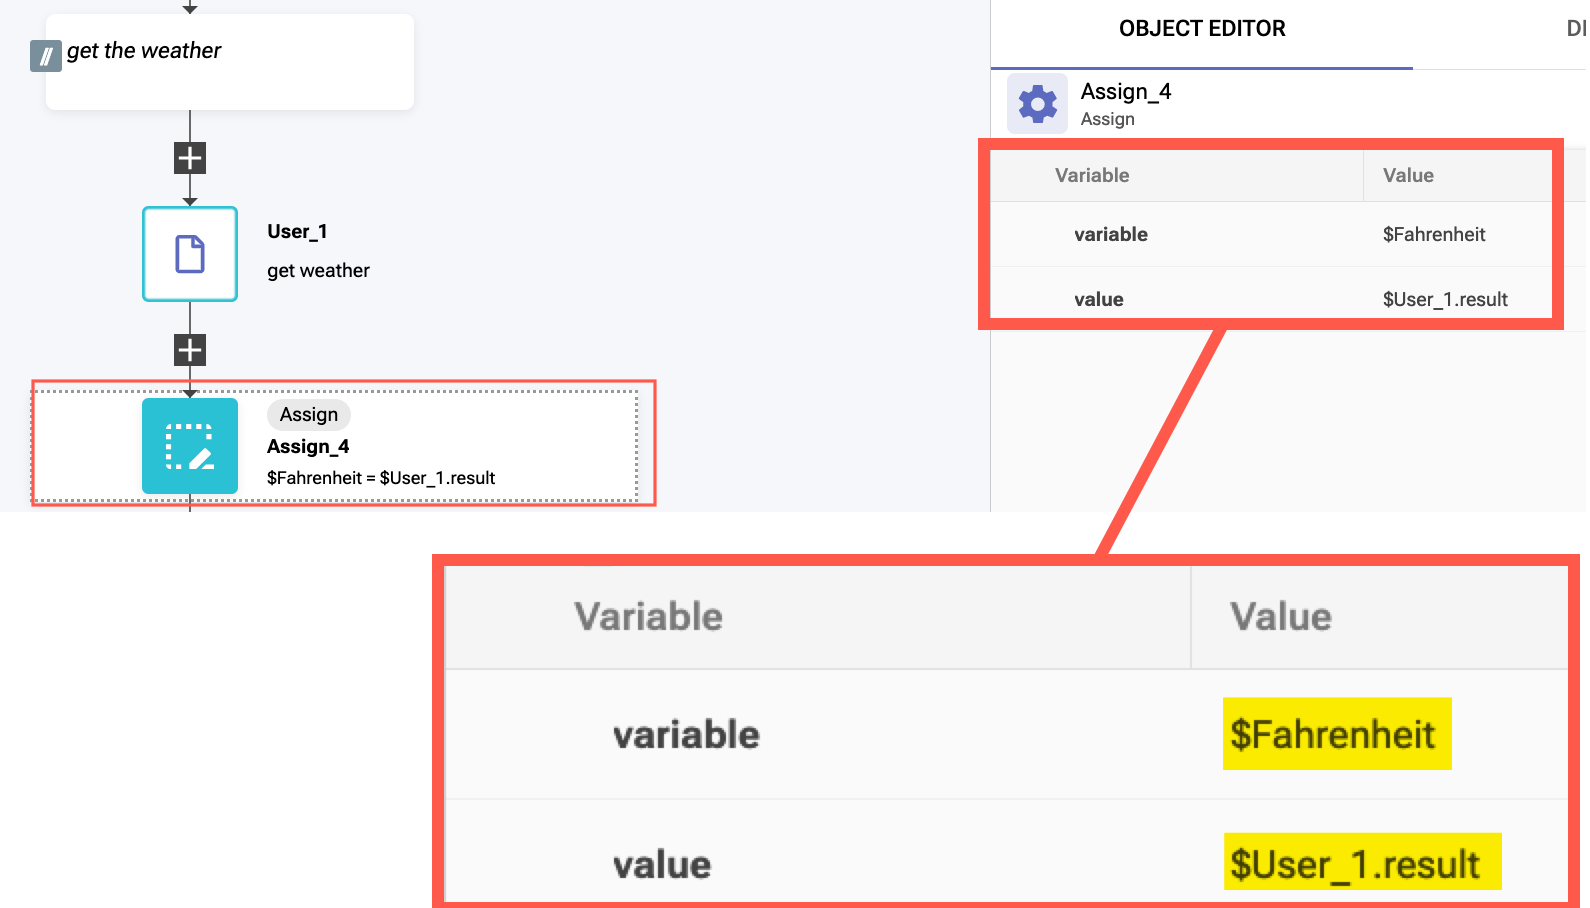
You are setting variable $Fahrenheit's value to equal the return value from the $User_1 subflow
[C] Review SevOne API payload requirements
Let's review what is required for the JSON object that you need to construct so that SevOne can ingest the data.
You defined the variables needed in the ***Start Block*** of the workflow.
- deviceName = "myWeather"
- stationId = "KDFW"
- timestamp = <you need to supply this>
- Fahrenheit = <you got this value from the "get weather" subflow>
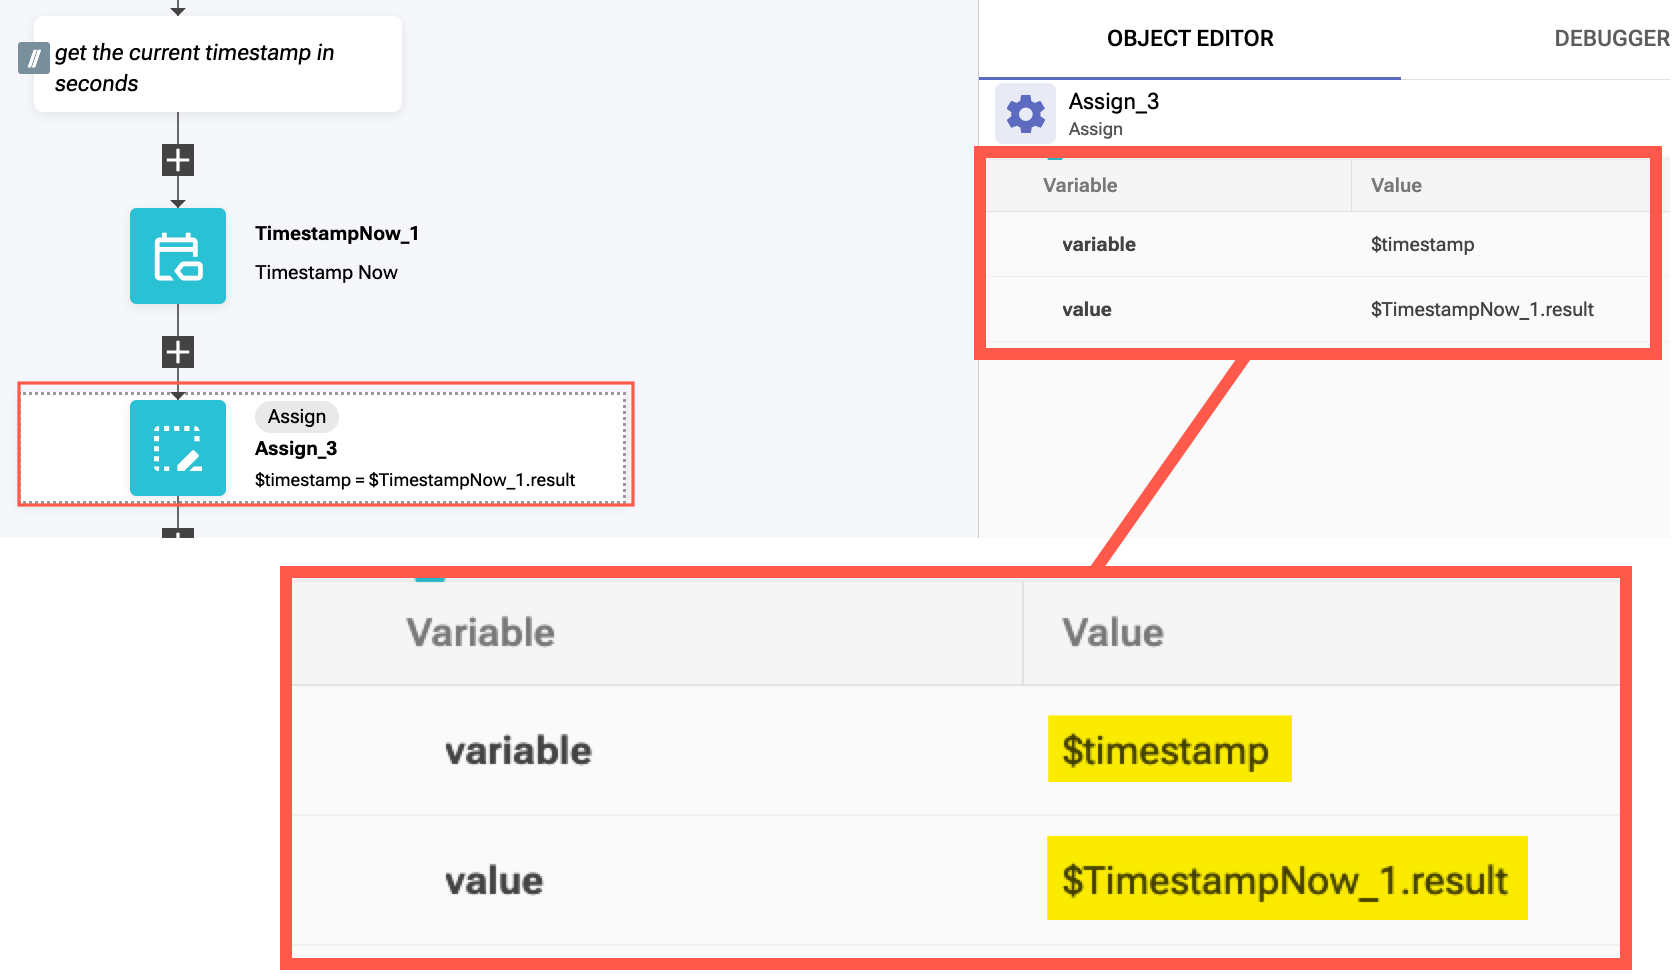
[D] Get the current timestamp
Find the "Timestamp Now" action block using the action block palette on the left side of the workflow editor.
Select Home > Common then perform a "Deep Search" for "Timestamp Now" (looks like a magnifying glass button)
Drag the Timestamp Now action block into the workflow under the timestamp comment. It doesn't require any field editing.
Next, add an Assign block underneath the timestamp block so we can assign the $timestamp variable its value using the result of the $TimestampNow_1 block.
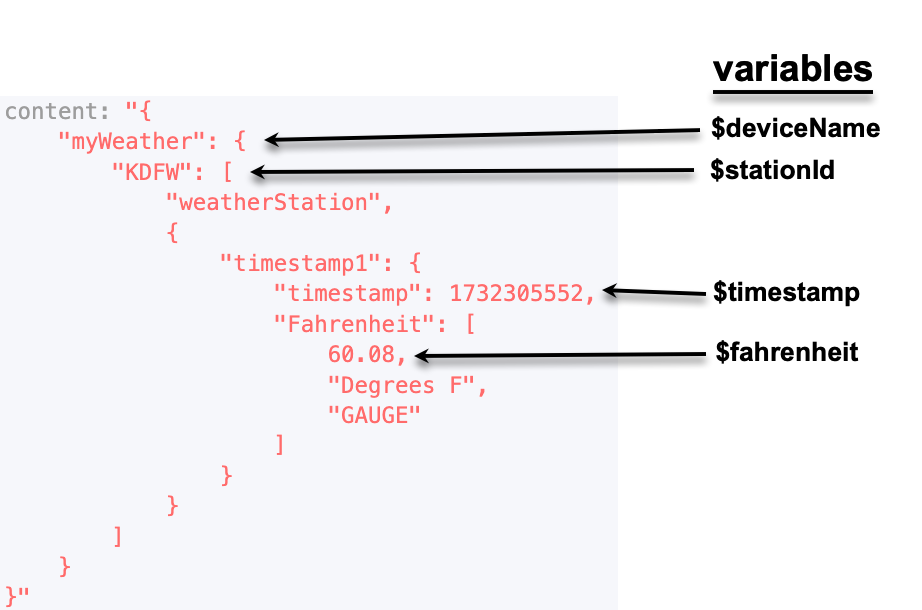
[E] Construct the SevOne API JSON object
You are close to completion! You now need to construct the SevOne payload using the values you've accumulated.
The SevOne API payload format requires a nested JSON object. So you need to create that structure first.
Add an Assign block underneath the "populate content" comment so we can create the nested object.
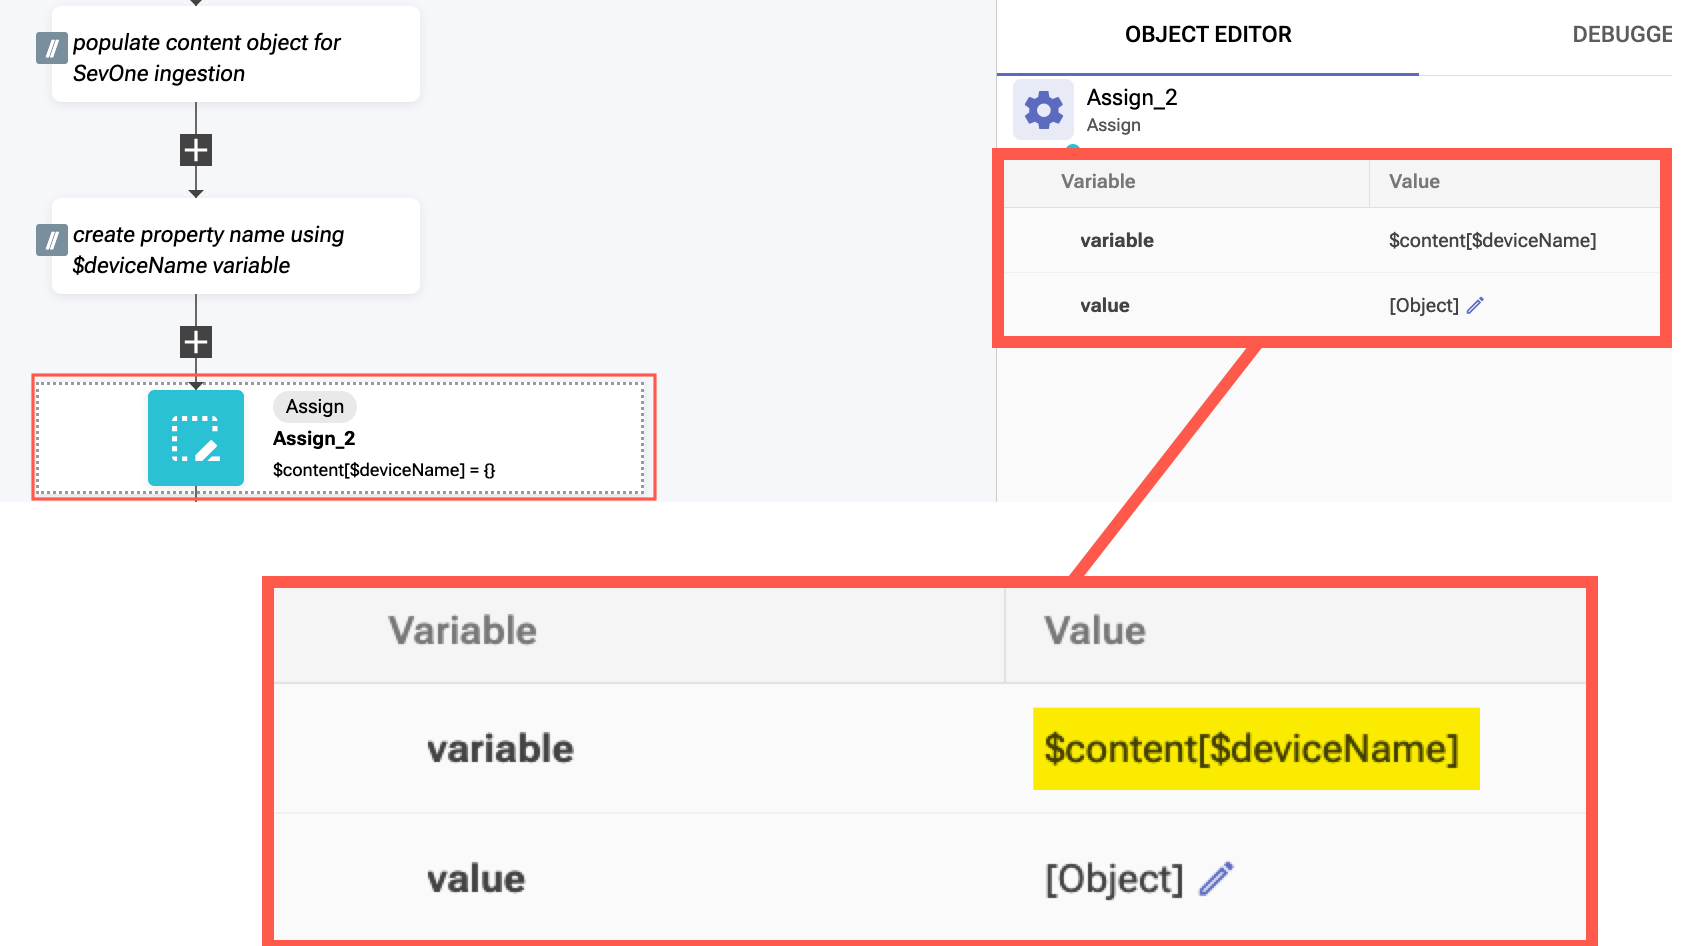
NOTE: In the Object Editor, for the Assign_2 block, replace the value [Object] with {}
Add another Assign block underneath the previous one for an array.
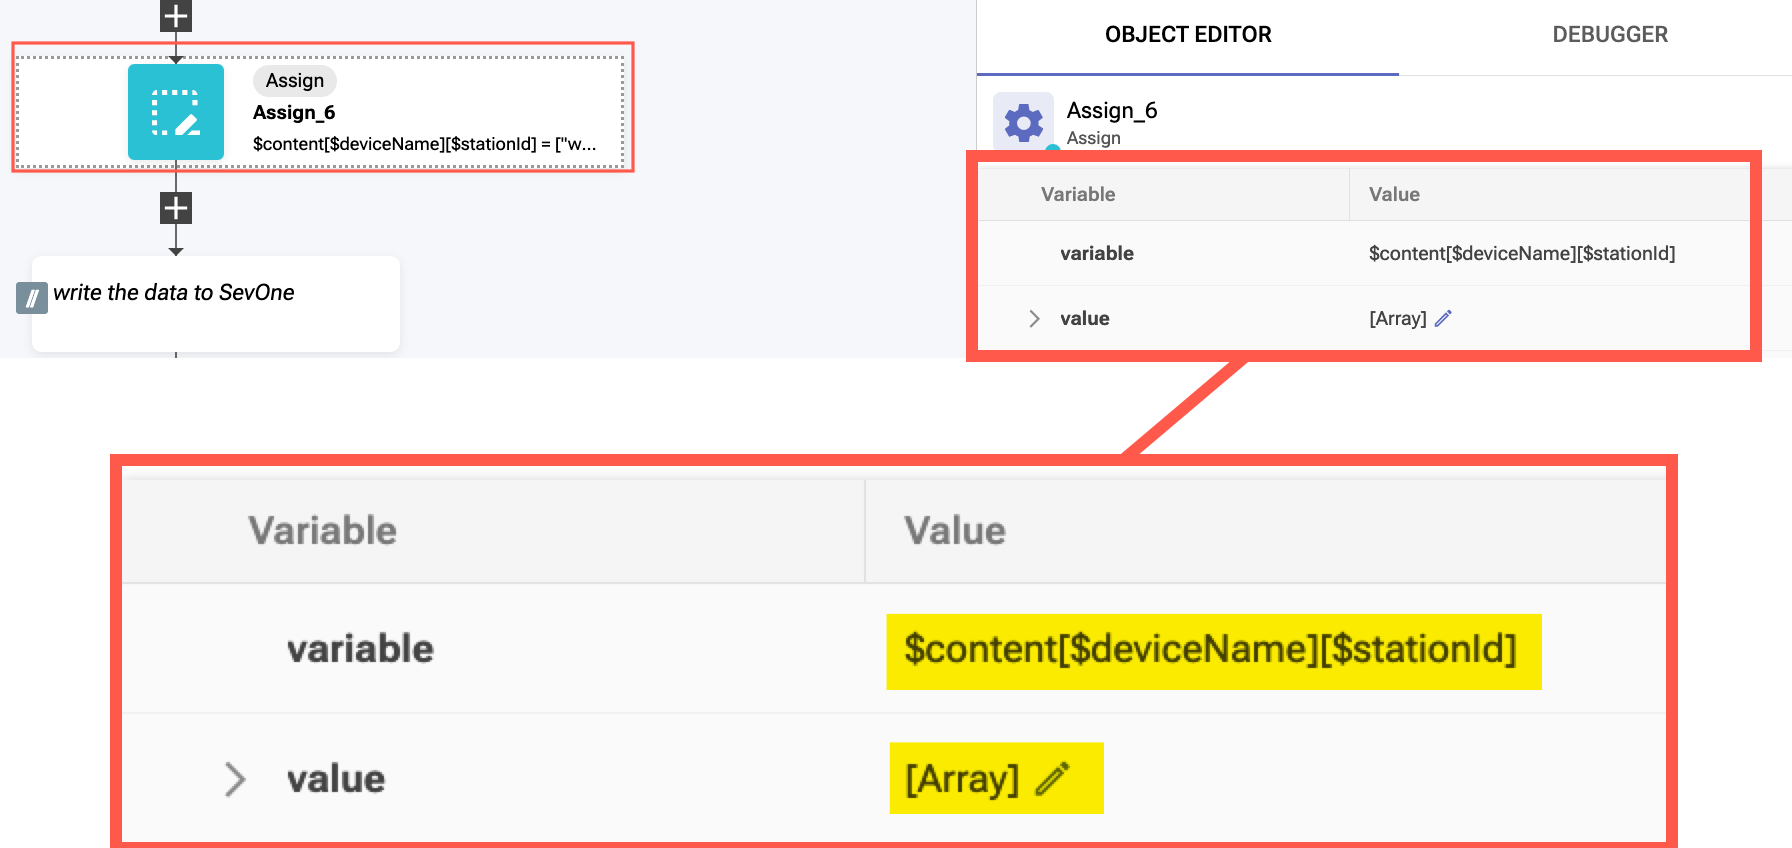
- variable: $content[$deviceName][$stationId]
- value: <cut-n-paste from the value code below>
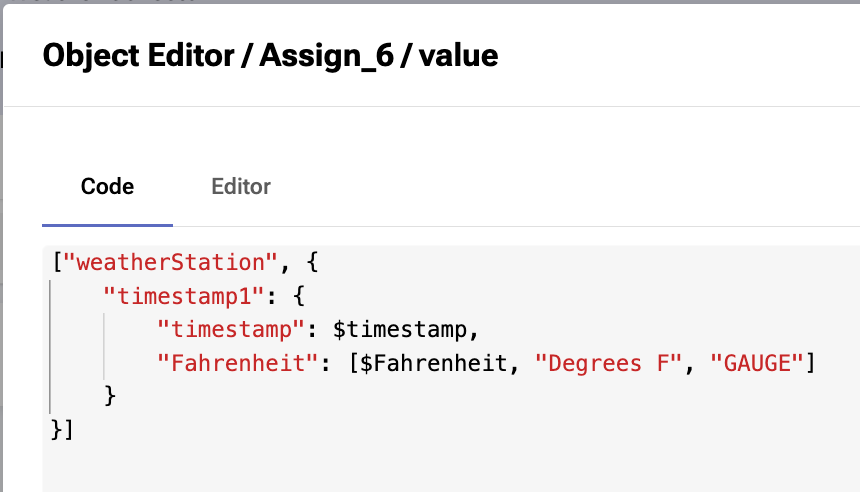
value code:
["weatherStation", {
    "timestamp1": {
        "timestamp": $timestamp,
        "Fahrenheit": [$Fahrenheit, "Degrees F", "GAUGE"]
    }
}]
[F] Add the SevOne subflow to the main workflow
Find the subflow action block using the action block palette on the left side of the workflow editor.
Select Home > User then select the SevOne Ingest Data - APIv3 subflow.
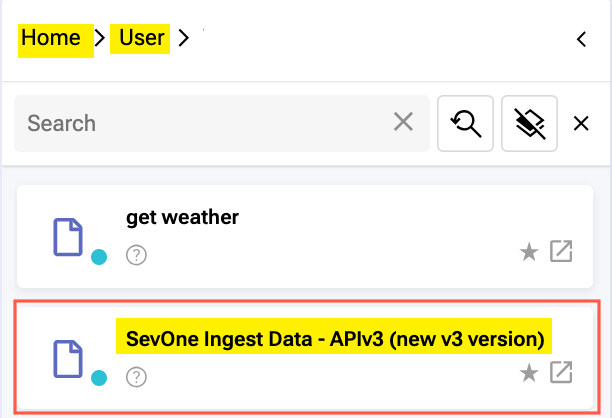
Drag the SevOne Ingest Data - APIv3 action block into the workflow under the SevOne comment and edit its settings in the Object Editor using the image for your guide:
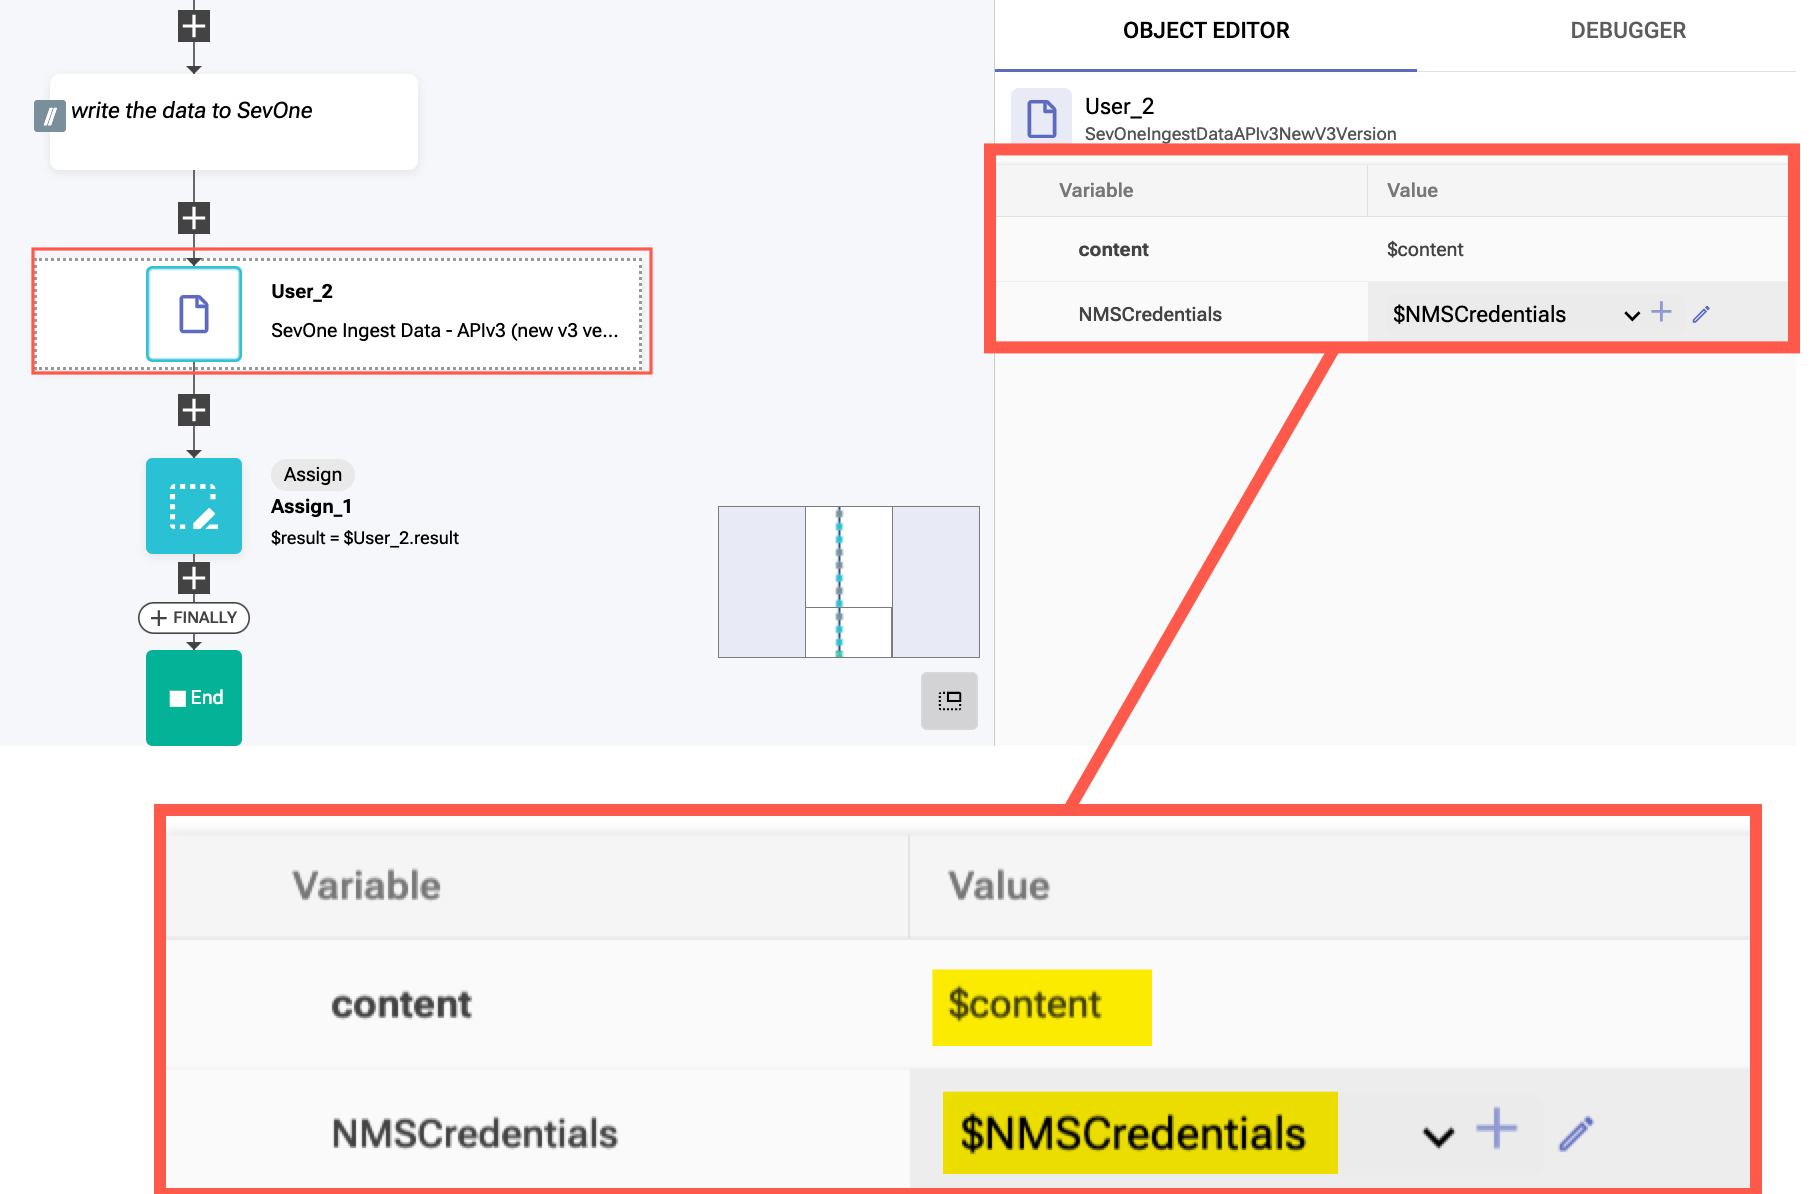
You are passing the $content payload that you constructed along with the $NMSCredentials to the SevOne Ingest Data - APIv3 action block so that it can ingest the data into SevOne using its API.
[G] Run your workflow! Your workflow should complete without errors.
[6] Login to IBM SevOne Data Insight and view your results
Now you can login into SevOne Data Insight and see your results!

NOTE: Wait 5 minutes, then run your workflow again and you should see results.
[7] Schedule your collector workflow within RNA so that it collects automatically
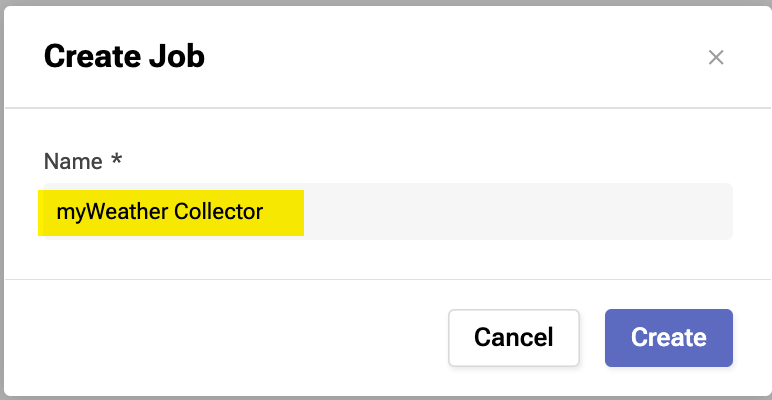
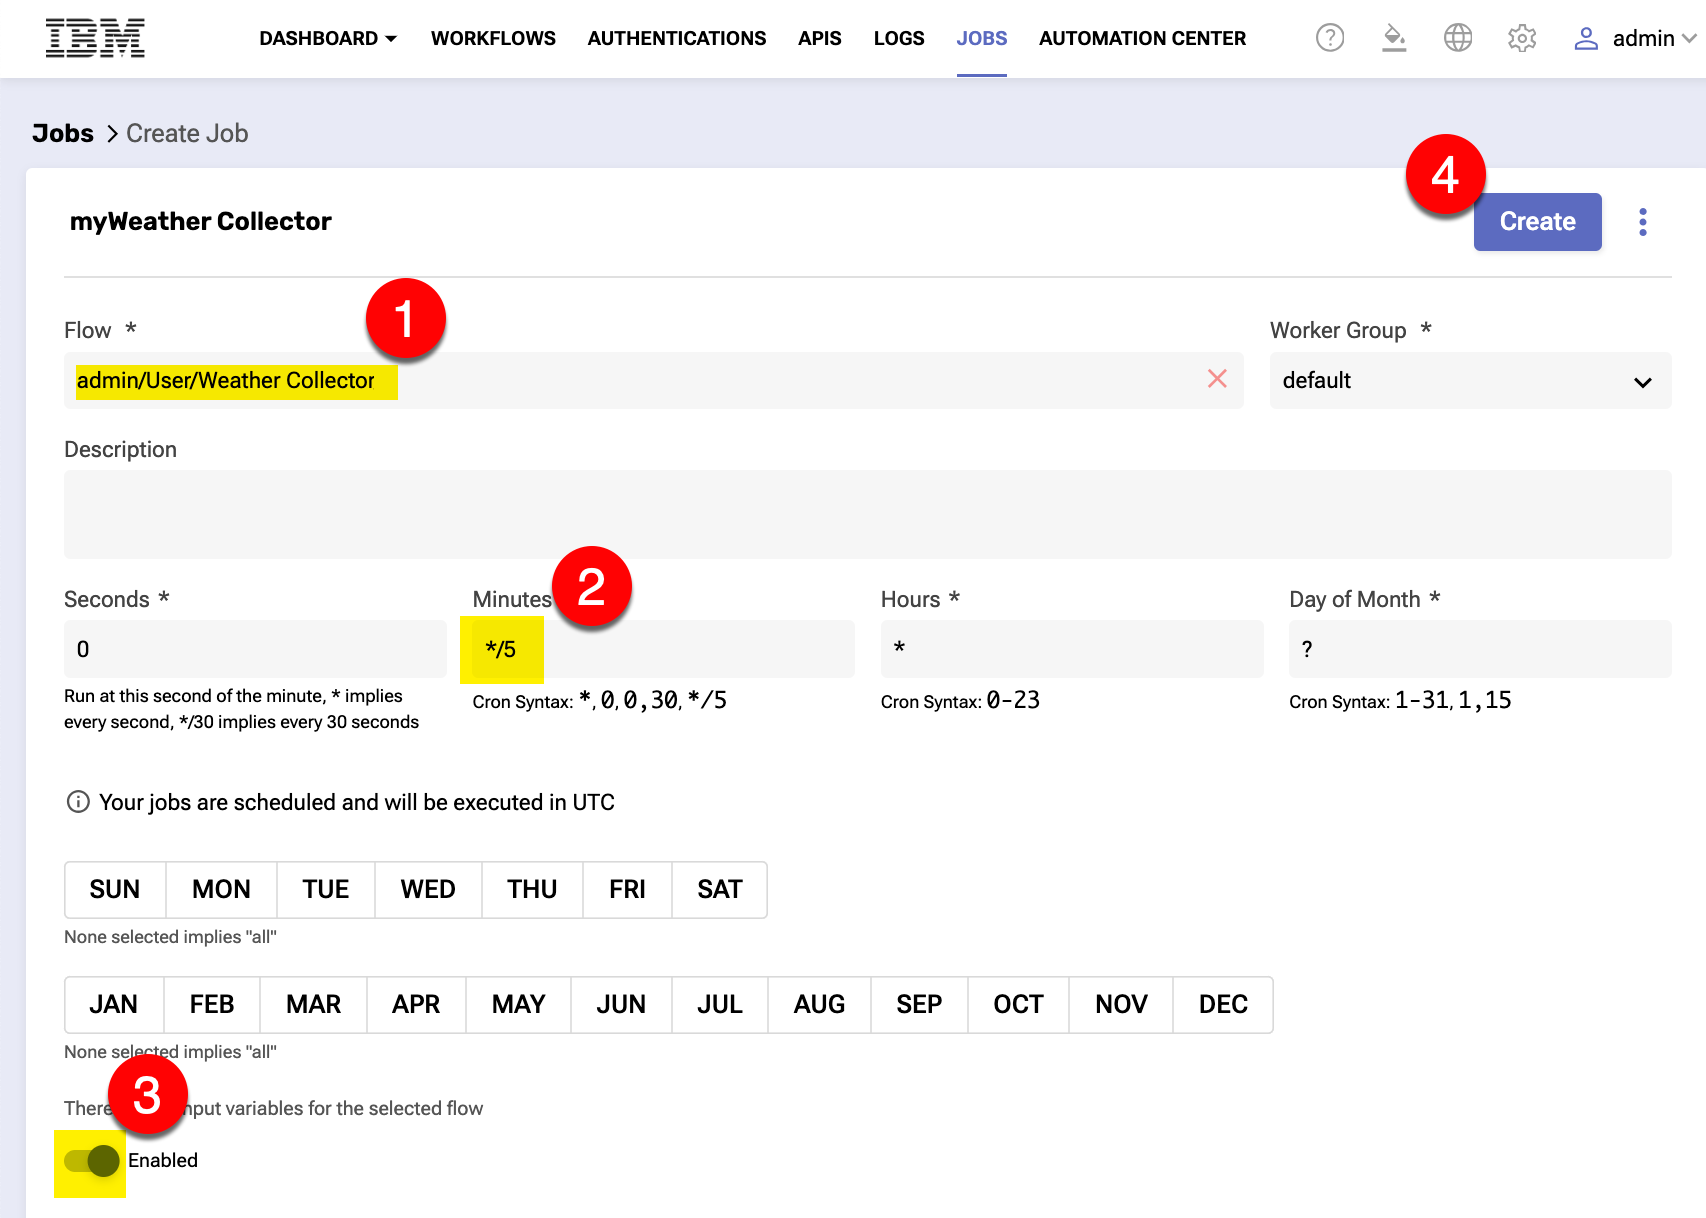
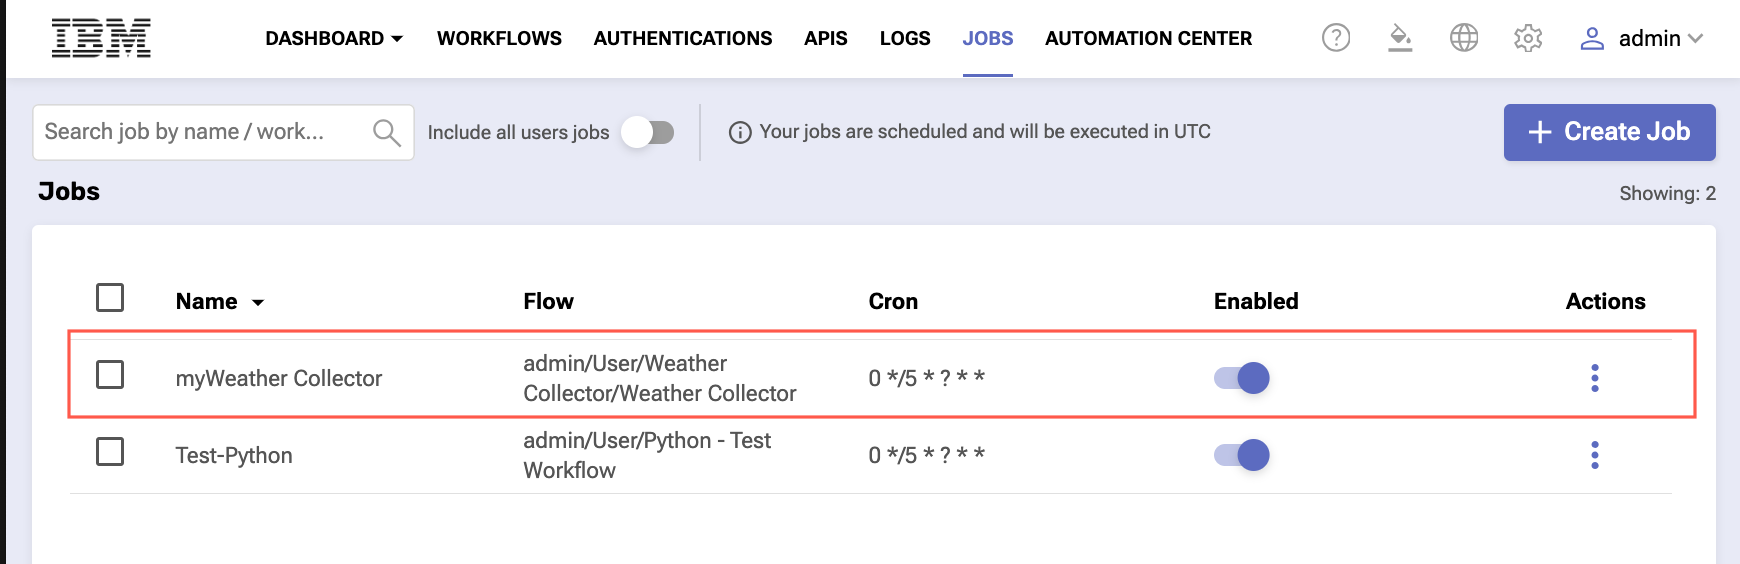
[A] In RNA, navigate to the Jobs tab to add your workflow as a scheduled job
[B] Click the [+ Create Job] button in the upper right-hand corner
[C] Create job using the images below as your guide: